How to Get Rid of Lock Icons on Encrypted Folders in Windows

Do you share your computer with other people? One of the best ways to keep your files secure when other people are using your PC is to encrypt them. Windows makes it easy to do this, but there is a slight drawback.

By default, when you encrypt a folder Windows displays a little lock icon over it. Generally, you don’t encrypt folders for no reason, so this is basically advertising to others that there’s something in there that you don’t want them to see!

Fear not, because you can actually get rid of this lock icon, it just requires a tiny bit of registry tweaking.

First, type regedit into the Windows 10 search box. Once it opens, navigate to the following key:

HKEY_LOCAL_MACHINE\SOFTWARE\Microsoft\Windows\CurrentVersion\Explorer\Shell Icons

If the Shell Icons key doesn’t exist, you’ll need to create it. To do so, scroll up to the Explorer key,right-click it, choose New, and select Key. Name the key Shell Icons.

2016-06-16_163815
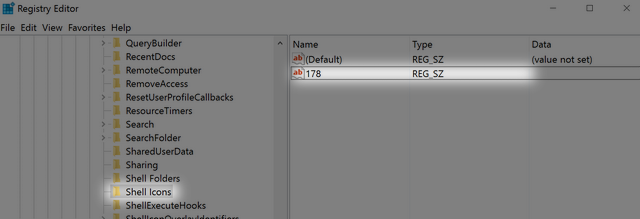
If you already have the key, you’ll need to create a new string value named 178. To do so, right-click Shell Icons, then select New, followed by String Value. Name it 178.

The next bit is a little complicated. You’ll need to make a blank icon file(.ico). TheWindowsClub has created one on this post (download here). Make note of where you saved the icon file, and edit the string for 178. To do so, right-click  it and select Modify. Insert the path of the blank .ico file.

Now, your encrypted files won’t have the big obvious lock telling anyone who uses your PC that you’re trying to hide something!

How to Auto-Forward Emails to Multiple Addresses in Gmail

Gmail’s forwarding feature makes it easy to automatically pass emails on to other accounts without any effort on your part. With Gmail’s filter feature and a few extra steps, you can also automatically forward emails to multiple accounts.

Step One

The first step is to set up the email forwarding. Go to Settings > Forwarding and POP/IMAP. Click the Add a forwarding address button. This will send an email to each address you wish to automatically forward emails to with a confirmation link that has to be clicked.

forwarding

You will have to repeat this step for each email.

Step Two

Once each of the emails have been confirmed, you can create a filter for the messages you want to forward. With the filter feature, you can automatically forward emails with a specific subject line, from a specific sender, or even messages with  specific keywords.

filter

Under Gmail’s Settings go to Filters and Blocked Addresses and click the Create new filter button. You can fill in the details for the emails you want to forward. Once you’ve filled it in, click Create filter with this search.

Step Three

The next step is to choose the emails you want to forward the emails to. Make sure to check “Forward it” and from the dropdown menu select the email addresses that have been confirmed.

filter2

Unfortunately, because of the way that Gmail forwarding works, you will have to repeat this step each time for each email you want to forward to.

Some Ways to Screenshot on Windows 10 Without Print Screen

I don’t have a Print Screen button on my keyboard, which means I can’t take screenshots using the normal method — hitting Print Screen, pasting the image into Paint, and saving as a PNG. But there are other reasons for not using Print Screen for screenshots, too. Here are a few alternative methods you can use instead.

Remap Print Screen

There are certain tools you can use, such as KeyTweak and SharpKeys, to remap keys in Windows. In this case, you’d remap some other button on your keyboard — like Power or Media Play — into Print Screen.

windows-screenshot-key-remap

I personally wouldn’t do this unless you’re absolutely certain that you’ll never use the remapped key, and even then I’d look to another method first. But if you want to learn more, check out our guide to remapping your keys.

Use the Snipping Tool

Windows comes with a built-in tool called the Snipping Tool. With it, you can snap quick screenshots of the entire screen, individual windows, or custom regions of the screen. It’s actually quite useful, but many don’t know about it.

screenshots-windows-10-snipping-tool

Open the Start Menu and search for “Snipping Tool” to launch it. Simple as that.

Use a Third-Party Tool

This is my preferred alternative method. All you have to do is install a free screenshot tool — I’m currently happy with Greenshot, but there are many others out there — and change its keyboard shortcut to whatever you want.

windows-screenshot-third-party-tool

My current setup is inspired by OS X:

  • Ctrl + Shift + 3 for a fullscreen screenshot.
  • Ctrl + Shift + 4 for a current window screenshot.

I have no Print Screen button but screenshots are easier than ever.