Monthly Archives: November 2016

How to Auto-Forward Emails to Multiple Addresses in Gmail

Gmail’s forwarding feature makes it easy to automatically pass emails on to other accounts without any effort on your part. With Gmail’s filter feature and a few extra steps, you can also automatically forward emails to multiple accounts.

Step One

The first step is to set up the email forwarding. Go to Settings > Forwarding and POP/IMAP. Click the Add a forwarding address button. This will send an email to each address you wish to automatically forward emails to with a confirmation link that has to be clicked.

forwarding

You will have to repeat this step for each email.

Step Two

Once each of the emails have been confirmed, you can create a filter for the messages you want to forward. With the filter feature, you can automatically forward emails with a specific subject line, from a specific sender, or even messages with  specific keywords.

filter

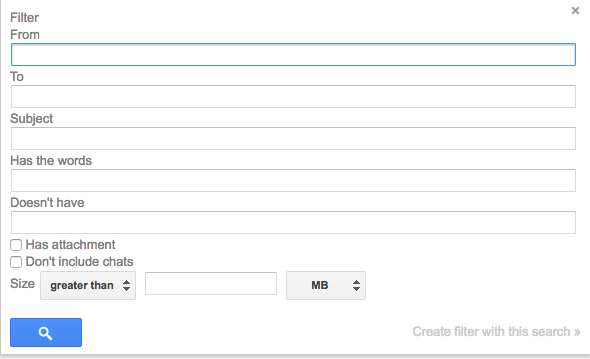
Under Gmail’s Settings go to Filters and Blocked Addresses and click the Create new filter button. You can fill in the details for the emails you want to forward. Once you’ve filled it in, click Create filter with this search.

Step Three

The next step is to choose the emails you want to forward the emails to. Make sure to check “Forward it” and from the dropdown menu select the email addresses that have been confirmed.

filter2

Unfortunately, because of the way that Gmail forwarding works, you will have to repeat this step each time for each email you want to forward to.

Some Ways to Screenshot on Windows 10 Without Print Screen

I don’t have a Print Screen button on my keyboard, which means I can’t take screenshots using the normal method — hitting Print Screen, pasting the image into Paint, and saving as a PNG. But there are other reasons for not using Print Screen for screenshots, too. Here are a few alternative methods you can use instead.

Remap Print Screen

There are certain tools you can use, such as KeyTweak and SharpKeys, to remap keys in Windows. In this case, you’d remap some other button on your keyboard — like Power or Media Play — into Print Screen.

windows-screenshot-key-remap

I personally wouldn’t do this unless you’re absolutely certain that you’ll never use the remapped key, and even then I’d look to another method first. But if you want to learn more, check out our guide to remapping your keys.

Use the Snipping Tool

Windows comes with a built-in tool called the Snipping Tool. With it, you can snap quick screenshots of the entire screen, individual windows, or custom regions of the screen. It’s actually quite useful, but many don’t know about it.

screenshots-windows-10-snipping-tool

Open the Start Menu and search for “Snipping Tool” to launch it. Simple as that.

Use a Third-Party Tool

This is my preferred alternative method. All you have to do is install a free screenshot tool — I’m currently happy with Greenshot, but there are many others out there — and change its keyboard shortcut to whatever you want.

windows-screenshot-third-party-tool

My current setup is inspired by OS X:

  • Ctrl + Shift + 3 for a fullscreen screenshot.
  • Ctrl + Shift + 4 for a current window screenshot.

I have no Print Screen button but screenshots are easier than ever.

How to Print Web Pages to PDF With Microsoft Edge

In earlier versions of Windows, Microsoft tried to pioneer an alternative file format to PDFs. It was first called XPS (in Windows XP, Vista, and 7) and later became OpenXPS (in Windows 8 and 8.1).

Now, in Windows 10, it seems Microsoft is finally ready to admit that PDFs are the way to go.

If you’re browsing the web using the Edge browser and you ever want to save a web page as a PDF for later, Microsoft has made it easy to do. Little by little, Edge is catching up to other browsers.

edge-print-to-pdf-overview

Let’s say you want to save one of our articles as a PDF file so you can freely revisit it whenever you want. First, go to the article you want to save, as shown above, and open the menu and select Print.

Edge will then take the entire web page and cut it up into pages, which you can browse by clicking the arrow buttons above the preview area.

edge-print-to-pdf-settings

For the Printer, select Microsoft Print to PDF. You can also customize how the PDF document will be formatted by changing the orientation, scale, margins, headers, footers, and which pages you want to include or exclude.

When ready, click Print at the bottom.

edge-print-to-pdf-final-step

Now all you have to do is navigate to a location, name the file, and click Save. And that’s it! Now you can turn any web page into a PDF document within seconds.