Category Archives: How To

How to Reset Your Windows 10 Password

Setting a password on your Windows 10 user account is great for security, but forgetting what that password is can be a headache.

1. Reset Your Password Online

In Windows 10, your user profile can either be a local and offline account or an online Microsoft account. The latter is the default and means that your account options are synced across devices, among other things. If you are using a Microsoft account, you can reset your password through Microsoft’s website. Sadly, if you’re on a local account, this method isn’t for you.

recover-your-account

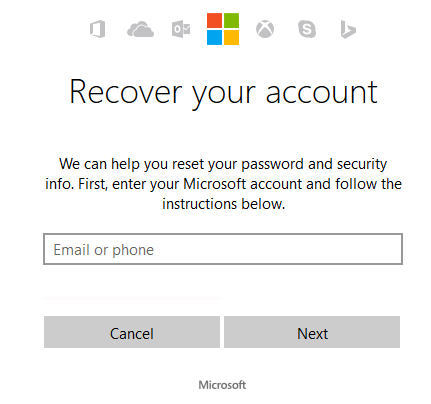
First, head to Microsoft’s password reset page. Once there, select the I’ve forgotten my password option and click Next. Follow the steps through, inputting the email address associated with your account. You’ll need to receive a verification code to prove your identity; this can be through email, but also by phone, if you’ve linked your number to your account.

It’s a really quick and easy process, so definitely opt for this method if you’re able to. But if you’re not using a Microsoft account or are without an Internet connection on the system you’re trying to access, keep reading.

2. Use a Password Reset Disk

This method requires some foresight. If you’ve already created a password reset disk, go to the login screen and input an incorrect password. It’ll say it’s the wrong password, so click OK. Then click the Reset password link that now appears.

password-reset-wizard

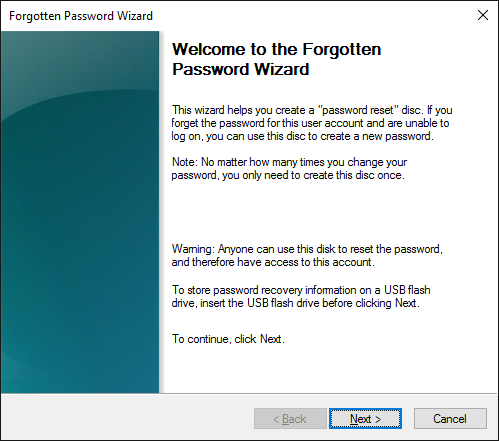
The Password Reset Wizard will appear. Plug in the drive that you created your reset disk on, then click Next. Select the relevant drive from the list and click Next. Input a new password and repeat it. Click Next and Finish and the process is done.

Again, this will only work if you’ve created the password reset disk before forgetting your password. To create one for the future, do a system search for create a password reset disk and select the relevant option. Connect a drive and follow the wizard through, then store your drive in a secure location.

3. Create a New User Account

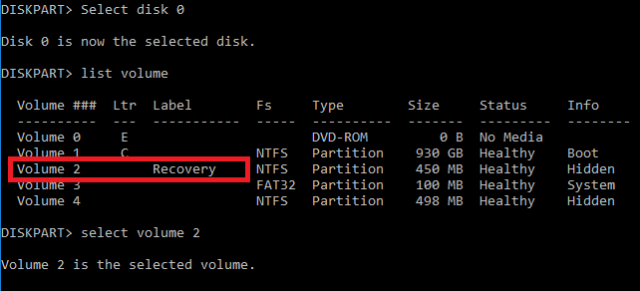
This is a slightly complicated method, but one which allows you to create a new user account in order to gain access to your system. First, you need to have a Windows 10 installation disk handy. Check out our guide on how to create installation media if you need help with that.

When ready, boot into your BIOS and change the boot order to make the installation disk take priority. Each system handles BIOS entry differently; restart your computer and you should see a message that tells you what key to press. Usually it’ll be ESC or one of the Function keys. For help, see our guide on how to enter the BIOS.

enter-bios-640x320

Boot to the Windows 10 installation disk, then press Shift + F10 to launch the Command Prompt. On the Windows 10 login screen you can enter the Ease of Access utility, but we’re going to change this button’s purpose. As such, input the following two lines into the Command Prompt in turn:

move c:\windows\system32\utilman.exe c:\windows\system32\utilman.exe.bak
copy c:\windows\system32\cmd.exe c:\windows\system32\utilman.exe

Now restart your machine and boot back to the login screen. Once here, click the Ease of accessbutton in the lower-right corner of the screen. This will then open the Command Prompt. Then input the following two lines in turn, replacing username with your desired account name:

net user username /add
net localgroup administrators username /add

Restart your computer and you’ll then be able to select your new user account from the login screen. Once logged in, you can then use File Explorer to access all the files within your old account.

However, if you still want to reset the password on that account, press Windows key + R to launch Run, input lusrmgr.msc and click OK. Now right click the old account, click Set Password… and then follow the prompts to change the password.

Remember Your Password

The best security advice is to use different passwords for everything, but it’s understandable that it isn’t easy to remember them all which is why password managers like LastPass are popular.

With  Windows 10, you don’t necessarily have to use a standard password to log into your account. Press Windows key + I and then navigate to Accounts > Sign-in options. Here you will find the ability to use a numerical pin or photo/gesture combination to sign in with.


How to Secure Your Gmail Account

Can you imagine how much data someone could steal if they hacked into your Gmail account? Better that you don’t find out. Instead of leaving your emails vulnerable, take these quick and easy steps to secure your account right now.

1. Access your security settings. Log into Gmail, click your profile photo at the top right of the screen, and select My Account to get to your dashboard. Under Sign-In & Security, click on Signing in to Google.

2. Set a new strong password. You absolutely do NOT want a weak password for your Gmail account. Check out these common password mistakes and make sure you avoid all of them. Instead,create an unbreakable password.

gmail-security-tip-password

To do this, under Password & Sign-In Method, click Password. Enter your current password, then enter your new password, and confirm.

3. Enable two-step verification. Sometimes called two-factor authentication, two-step verification just means that you’ll need a password AND another identifier to access your account. In this case, your physical smartphone.

To set it up, under Password & Sign-In Method, click 2-Step Verification. When prompted, enter your mobile phone number. You’ll receive a text message with a code — enter it when prompted.

gmail-security-tip-two-step-verification

From now on, whenever you log into your account, you’ll receive a code from Gmail on your phone. That way if someone tries to hack into your account, they won’t be able to since they don’t have your phone. That’s it! Done.

If you really want to be secure, however, you may want to consider migrating away from Gmail and using a safer alternative email service like ProtonMail or GMX. But for most people, these three steps should be enough.

How to Free Up Disk Space in Windows 10

It’s far too easy to run out of disk space. If you have countless high-resolution photos, hundreds of HD-quality movies, and tens of thousands of songs, you can find yourself hitting your memory limit in no time.

Whatever the reason, if you hit your limit, you’ll want to know how to free up space without deleting your personal media. Here are some tips for  freeing up disk space on Windows 10.

Delete Old Versions of Windows

Windows automatically saves data from older versions of Windows after you upgrade. This lets you roll back to previous versions  if needed, however, the old data takes up a lot of space.

Even if you already knew this, you might not have realized that installing the latest Anniversary Update will also leave behind such files. Luckily, deleting them is easy.

Open the Settings app, navigate to System > Storage, and click on your primary drive. You will be presented with a list of different categories along with how much space they’re using. Scroll down until you find Temporary Files, then click on it.

windows-storage-454x500

Lastly, mark the checkbox next to Previous Versions of  Windows and hit Remove Files.

windows-storage-remove-temp-389x500

(Note: You can still use the old Disk Clean-up method, if you prefer).

Clear the Update Cache

Another way of removing storage space that’s being unnecessarily hogged by Windows is to delete the update cache.

The update cache consists of copies of the update installation files. The operating system uses them if you’re ever forced to reapply an update; it saves downloading them again. Although it’s a good idea, they take up a lot of space. Unless you either have a very slow Internet connection or you’re seriously limited with data caps by your ISP, you can safely remove them.

Sadly, the process is not particularly straightforward.

The first step is stopping the Windows Update service. Search for Services, right-click on the top result, and open it as an administrator.

services-admin

Next, scroll down the list of entries until you find Windows Update. Right-click on it and choose Stop.

windows-update-service

Now you’ll need to delete the files. Press Windows key + R to open the run box, then type C:\Windows\SoftwareDistribution\ and hit Enter.

windows-run

You can delete everything within the Downloads folder.

Lastly, you’ll need to head back to services and re-enable Windows Update.

(Note: This is also an excellent way to remove corrupted update files.)

Delete Hibernation Data

Hibernate and Sleep are two ways of conserving power when you’re not using your Windowsmachine.

There is one key difference – Sleep mode saves all your open documents and running applications to your device’s RAM, whereas Hibernate saves it all to the hard disk. Sleep is akin to putting atelevision on standby, whereas Hibernate lets your computer shut down completely.

If you don’t use hibernate mode, you can disable it. This will automatically delete any associated saved data from previous hibernations.

(Clearly, you should not do this if you find yourself making regular use of the feature).

To disable it, search for Command Prompt, right-click it, and choose Open as Administrator.

Type powercfg.exe -h off and press Enter. That’s it, you won’t see a notification or confirmation.

hibernation-off

If you change your mind, repeat the above steps, but type powercfg.exe -h on instead.

Delete Delivery Optimization Files

Windows 10 introduced a new update feature – called “Delivery Optimization” – that allows your computer to pull updates from other machines nearby. The theory is that updates will be delivered faster, but in practice, a lot of people have complained about higher bandwidth usage and increased memory usage.

It’s easy to delete the files, but first you’ll need to disable the feature – otherwise the files will just accumulate again.

Head to Start > Settings > Update & Security > Advanced Options > Choose How Updates Are Delivered. Once there, make sure the slider is set to the Off position.

updates-delivery-452x500

Now search for Disk Clean-up and open the app. It’ll spend a few seconds scanning your device before presenting you with a list of files that can be removed. Scroll down until you find the entry called Delivery Optimization Files. Click in the checkbox, then hit OKWindows will take care of the rest.

clean-up

Delete the OEM Recovery Partition

Most computers come with an OEM recovery partition. Thanks to Windows 10, they are largely redundant and can be safely removed. Unfortunately, the only way to do this is to create a recovery drive. Typically, this means using a USB stick.

Windows comes with a handy tool for creating a drive; you can find it by searching for Create aRecovery Drive from the Taskbar.

recovery-drive

Follow the on-screen instructions and enter a USB stick when prompted. Once the process is finished, you’ll see the option to delete the recovery partition from your PC on the final screen. Click the link and choose Delete to proceed.

Delete the Windows 10 Recovery Partition

Warning: Only proceed with this option if you are desperate because you will lose the ability to use any of Windows 10’s recovery options and you will not be able to boot into the recovery environment to troubleshoot other aspects of the operating system.

It’s highly advisable to make complete backups of your data and create a USB recovery drive before continuing.

Firstly, open Command Prompt as an administrator. Type Diskpart and press Enter, then type List disk and press Enter again.

list-disk

Next, type Select disk X (replace the X with the number of the disk where your recovery partition is saved). Then type List volume.

You’ll be shown a list of all the volumes on the disk, including your recovery partition. Type Select volume X (replace X with the correct number, on my machine, it’s Volume 2).select-volume-640x291

Lastly, type Delete volume and hit Enter.