How to Unblock a Listen Port

How to establish a dialog between two servers?  The answer is you can use a port.  This type of communication can be between you and your webmail server, a website, or an Internet-based service. However, sometimes when you use some programs, you will get a message saying the required port is blocked if your port is blocked. Here is the instruction to tell you how to unblock a listen port,
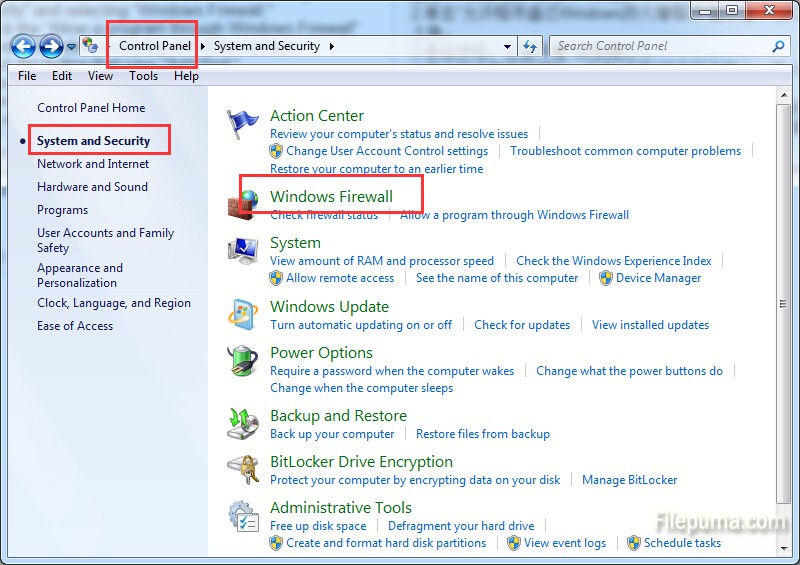
1. Click “Start—-Control Pane—-Security,” and then go to “Windows Firewall.”

1

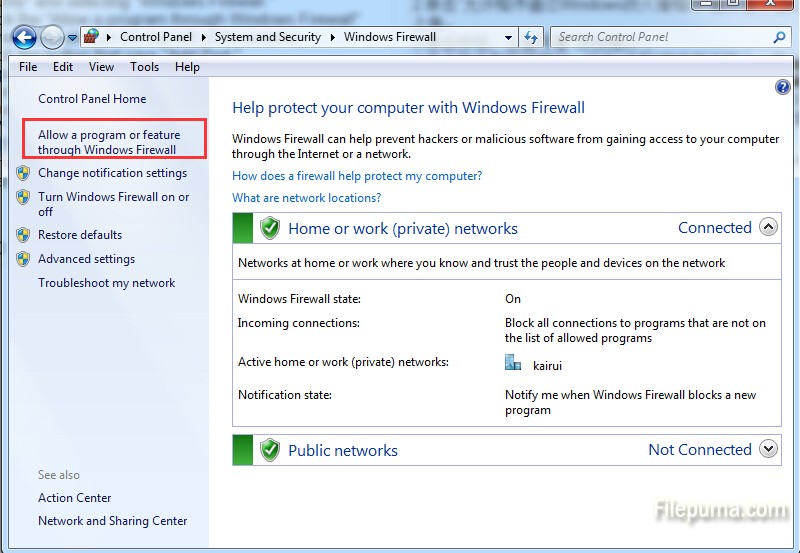
2. Click the “Allow a program through Windows Firewall” preference.

2

3. Click the button that says “Add Port.”

4. Name the new port by typing the name and the number of the listen port you want unblocked in the “Port Number” text bar, click the “TCP” or “UDP” check-box to select the protocol of the port. Click “OK”.

5. Now you’ve successfully unblock the listen port.

How to Use WebcamMax on Skype

WebcamMax is a great program which is added thousands of fantastic effects to webcam video for your live chats and recording. It works for almost all webcam programs such as Windows Live Messenger, Skype, Yahoo Messenger, YouTube, Ustream, JustinTV, and much more. Here is the instruction to tell you how to use it on Skype.

1
1. Download and install both WebcamMax and Skype from here:

http://www.filepuma.com/download/webcammax_7.9.1.2-8546/

http://www.filepuma.com/download/skype_7.3.0.101-8523/

2. Run WebcamMax. Click “Live Webcam—-Play Media—-Capture Screen” to select the type of media you want to send.

3. Click “Doodling” to draw custom overlays.

4. Open Skype and sign in your Skype account.

5. Click the “Tools—-Options” from the menu list.

2

6. Click the “Video Settings” tab. Click the “Select webcam” and choose “WebcamMax Capture Fast” to switch Skype’s settings to use the input from WebcamMax. Click “Save.”

3

7. Start a video chat and you will use WebcamMax on Skype. You can use the effects in WebcamMax now.

How to create a tag and Revert in TortoiseSVN

TortoiseSVN is an easy-to-use SCM/source control software for Windows and possibly the best standalone Apache™ Subversion® client there is. One of the great features of TortoiseSVN is that it remembers every change made to its files and directories. Meanwhile, tagging can make this process much easier by giving you the specific revision. Here is the instruction to tell you how to create a Tag and perform a revert in TortoiseSVN.


1. Select your working copy, right click on it to open TortoiseSVN’ menu. Select the ‘Branch/Tag option.

1

2. Select the tags path and add the tag you want. Add an appropriate log message.

3. Select the specific revision you wish to tag and click ‘OK.’

2

4. Now it is easy to roll back to previous tagged revisions by tagging at a later date, right-click on your working copy and select ‘Show Log.’

5. Select the revision you want to revert to and right-click. Select ‘Revert to this revision.’

6. Confirm you wish to revert.

7. TortoiseSVN will now revert to this earlier revision.