How to Use WebcamMax on Skype

WebcamMax is a great program which is added thousands of fantastic effects to webcam video for your live chats and recording. It works for almost all webcam programs such as Windows Live Messenger, Skype, Yahoo Messenger, YouTube, Ustream, JustinTV, and much more. Here is the instruction to tell you how to use it on Skype.

1
1. Download and install both WebcamMax and Skype from here:

http://www.filepuma.com/download/webcammax_7.9.1.2-8546/

http://www.filepuma.com/download/skype_7.3.0.101-8523/

2. Run WebcamMax. Click “Live Webcam—-Play Media—-Capture Screen” to select the type of media you want to send.

3. Click “Doodling” to draw custom overlays.

4. Open Skype and sign in your Skype account.

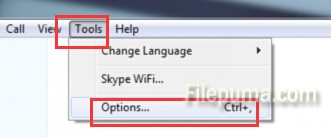
5. Click the “Tools—-Options” from the menu list.

2

6. Click the “Video Settings” tab. Click the “Select webcam” and choose “WebcamMax Capture Fast” to switch Skype’s settings to use the input from WebcamMax. Click “Save.”

3

7. Start a video chat and you will use WebcamMax on Skype. You can use the effects in WebcamMax now.

How to create a tag and Revert in TortoiseSVN

TortoiseSVN is an easy-to-use SCM/source control software for Windows and possibly the best standalone Apache™ Subversion® client there is. One of the great features of TortoiseSVN is that it remembers every change made to its files and directories. Meanwhile, tagging can make this process much easier by giving you the specific revision. Here is the instruction to tell you how to create a Tag and perform a revert in TortoiseSVN.


1. Select your working copy, right click on it to open TortoiseSVN’ menu. Select the ‘Branch/Tag option.

1

2. Select the tags path and add the tag you want. Add an appropriate log message.

3. Select the specific revision you wish to tag and click ‘OK.’

2

4. Now it is easy to roll back to previous tagged revisions by tagging at a later date, right-click on your working copy and select ‘Show Log.’

5. Select the revision you want to revert to and right-click. Select ‘Revert to this revision.’

6. Confirm you wish to revert.

7. TortoiseSVN will now revert to this earlier revision.

How to Clear the Administrator’s Password on a Windows 8 Computer

Generally users would like to set a password for an administrator for their data’s safety. But sometimes this PC may need to be used by some other users. Here we tell you how to clear the password via the Users section of the PC Settings screen on a Windows 8 computer.

windows8-change-password

1. Press “Windows-C” to open the Charms menu, click “Settings—-Change PC Settings.”

2. Click the “Users” icon to load a list of registered user accounts on the laptop.

3. Click the administrator account you want to change, and then click “Change Your Password.”

4. Enter the current password for the account in the Current Password field, and then click “Next.”

5. Enter a new password, and then enter this same password again in the Reenter Password field. 6. Enter a password hint in the provided field, click “Next,” and then click “Finish.”